
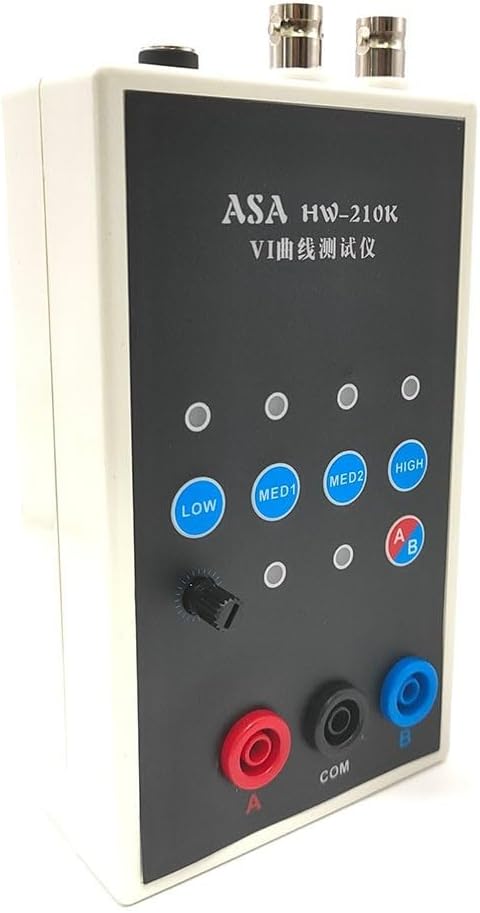
HW-210K Dual-Channel VI Curve Tracer for Circuit Board Fault Finding, Online Component Tester with ASA Analysis, Oscilloscope VI Adapter for PCB
Product details
| Management number | 220423312 | Release Date | 2026/05/03 | List Price | US$16.68 | Model Number | 220423312 | ||
|---|---|---|---|---|---|---|---|---|---|
| Category | |||||||||
Features:* and *Made of - materials, sturdy and *4 test frequencies can be used by connecting an oscilloscope, both analog and digital oscilloscopes can be used.*Dual signal input and alternate display function make it easier for you to use.*4-speed frequency conversion, alternating speed is adjustable, you can adjust it according to your needs.*One-click single /alternative display, giving you a better user experience.*Do not charge circuit board when testing it online. If there is a large capacitor on the circuit board, please discharge the capacitor first, otherwise it is easy to burn out the VI test board.Specification:*material: plastic*: 2 channels*Frequency: 4 levels*Package size: 195*135*105mm/7.7*5.3*4.1 inches*Package weight: 435g/1.0lbsAnalog oscilloscope connection :* connection of analog oscilloscope is relatively simple, and different oscilloscopes are slightly different.*Adjust the oscilloscope to x Y mode. Some oscilloscopes have button selection, while others select x Y mode with a knob. Please study on your own.*Connect the BNC cable to the oscilloscope and turn on the power. Normally, a horizontal line is displayed. Adjust the xY vertical parameters to about 1V/div, and n adjust the xY attenuation so that the horizontal line is within the display box. It can also test the version through VI. The x-attenuation potentiometer above can assist in adjusting the length of the horizontal line. If the test leads are short-circuited, a vertical line will appear under normal circumstances. If the vertical line is too long or too short, you need to adjust the Y parameters so that vertical line is within the display frame. Half a square or 1 square on the edge is better. If the horizontal and vertical lines are normal, you can enter normal measurement.How to connect a digital oscilloscope:*For digital oscilloscopes, enter x Y mode through the menu or keys. The x and Y s are adjusted to 1V/div, and single-track oscilloscope only needs to adjust the Y . Adjust time base to 1-5 milliseconds. Select DC coupling for x Y s with attenuation of 1x.*When scope is not connected, the screen should be a bright spot. Adjust the horizontal and vertical to center the highlight. Connect the VI tester. Normally, it should be a horizontal line. Adjust the 103 potentiometer above the VI board to make a horizontal line appear in the display frame. , half a grid or 1 grid to the edge is better. Short-circuit the test leads, and the display should be vertical lines. Adjust the Y parameters so that the vertical line is in the display box. At this point, debugging is basically over.Package Included:1X tester1X pair BNC cable1X pair of test cables
- 【Handheld Dual-channel VI Curve Tester】Made of materials, sturdy and . Can be easily handheld for convenient usage.
- 【Online ASA Tester】Allows online testing of without the need for charging. Discharge capacitors before testing to prevent damage.
- 【4 Test Frequencies】Connect an oscilloscope for analog or digital testing. Offers 4 different frequencies to suit different needs.
- 【Dual Signal Input and Alternate Display】Provides easier usage with dual signal input and alternate display functions. Enhances user experience.
- 【Adjustable Speed and Frequency Conversion】4-speed frequency conversion with adjustable alternating speed. Allows customization according to specific requirements.
- 【Easy Connection with Oscilloscopes】Simple connection with analog oscilloscopes. Adjust parameters for proper display. Connect with VI tester for accurate measurements.
- Package Included:
- - 1 Handheld Dual-channel VI Curve Tester
- - 1 pair of BNC cables
- - 1 pair of test cables
| Color | as picture show |
|---|---|
| Model | U1742M0JV3M89AT121412U342F16V |
| Brand Name | FABULETTA |
| Item Weight | 410 Grams |
| Part Number | U1742M0JV3M89AT121412U342F16V |
| Manufacturer | FABULETTA |
| Item Dimensions | 5.91 x 2.36 x 1.18 inches |


Bestseller ranking
Coolers


Customers who viewed this product also viewed
Masonry Tools


Correction of product information
If you notice any omissions or errors in the product information on this page, please use the correction request form below.
Correction Request Form